Delicious recipes from the kitchens of the Butler sisters

Thursday, January 15, 2015

Chocolate and Coconut Cream Pie Bars

These are totally heavenly!

YIELD: MAKES 16 BARS

Note: To toast the coconut, place it in a single layer in a nonstick skillet and cook over medium heat, stirring frequently until it browns evenly. Watch closely so it doesn't burn. I've also halved this recipe with great success - use a 8-inch or 9-inch square baking pan. Because many of the steps can be prepared ahead of time and/or need to be coordinated, read through the recipe before starting. Also, these bars can be made up to a day in advance - if doing so, I recommend not topping them with the whipped cream until you are ready to serve (whipped cream that hasn't been stabilized by gelatin, which I chose not to do here, has a tendency to weep and give off liquid if refrigerated over an hour or so).

INGREDIENTS

    Crust Ingredients:
  • 2 cups all-purpose flour
  • 1/2 cup powdered sugar
  • 1 cup (2 sticks) butter, cut into 10-12 pieces
  • Ganache Ingredients:
  • 1/4 cup heavy cream
  • 6 ounces (about 1 cup) semisweet chocolate chips
  • Coconut Cream Filling Ingredients:
  • 3 cups half-and-half
  • 3 cups coconut milk
  • 4 eggs
  • 1 1/2 cups granulated sugar
  • 2/3 cup cornstarch
  • 1/2 teaspoon salt
  • 1/2 teaspoon coconut extract
  • 1/2 teaspoon vanilla extract
  • 1 1/2 cup sweetened, flaked coconut
  • Whipped Cream Topping Ingredients:
  • 2 cups heavy whipping cream
  • 3-4 tablespoons powdered sugar
  • 1/2 cup coconut, toasted (see note above)

DIRECTIONS

  1. Preheat the oven to 350°F. Line a 9X13-inch baking dish with foil or parchment paper, leaving a 2-3 inch overhang on both of the long sides to help remove the bars after baking.
  2. In a large bowl, combine the flour and powdered sugar. Cut the butter into the dry ingredients using a pastry blender, two knives or using a food processor for this entire step. Press the mixture into the prepared baking dish. Bake for 16-18 minutes until the crust is light brown. Cool on a wire rack.
  3. While the shortbread is baking, place the chocolate for the ganache (1 cup of semisweet chocolate chips) in a medium bowl. Bring the cream to a simmer in a small saucepan (or microwave it for a 30 seconds or so). Once the cream reaches a simmer, pour the cream over the chocolate and let the mixture stand for 1-2 minutes. Stir completely until a shiny, smooth ganache forms. Once the crust has cooled fora bout 10 minutes, pour the ganache over the bottom of the crust and smooth to the edges. Place the chocolate covered crust in the fridge to chill until the ganache is set into a firm layer and the crust is cooled completely.
  4. While the crust is chilling, make the coconut cream filling by combining the half-and-half, coconut milk, eggs, sugar, cornstarch, and salt in a large saucepan. Bring the mixture to a boil, whisking constantly until it is very thick like warm pudding. Alternately (and I've actually done it this way for the coconut cream pie with great results), you can combine all those same ingredients in a large microwave-safe bowl and cook for one-minute increments, stirring well after each minute. It will take anywhere from 5 to 15 minutes to thicken in the microwave. I always strain my custard/pudding mixures through a fine-mesh strainer into another bowl. That is optional but it helps get rid of any little bits of cooked egg. Once the mixture thickens and after it has been strained (if you choose to do so), stir in the coconut and vanilla extracts and untoasted coconut. Pour the filling over the chilled ganache and refrigerate the bars until they are firm and set up, about 4 hours.
  5. For the whipped topping, combine the heavy cream and powdered sugar in a large bowl and blend on medium-high speed with a handheld electric mixer until soft peaks form and the cream is thick and stabilized. Spread the cream over the chilled bars and sprinkle on the toasted coconut. Chill until ready to serve. Use the foil or parchment overhang to lift the bars from the pan. Cut into pieces and serve.
Recipe adapted by Mel's Kitchen from Willow Bird Baking

Wednesday, January 14, 2015

Salted Nut Roll Bites

I love that these have honey and not a bunch of sugar.
 
makes about 30 "bites"
Ingredients
  • ½ cup peanut butter
  • ½ cup honey
  • ½ tsp vanilla
  • 1 cup nonfat dry milk
  • 2 cups Honey Roasted Peanuts, finely chopped and divided
  • about 30 mini marshmallows
Instructions
  1. In a medium bowl combine peanut butter, honey, vanilla, dry milk and 1 cup of chopped peanuts. Stir until combined.
  2. Portion out about one tablespoon of mixture, flatten and wrap it around a mini marshmallow.
  3. Roll in remaining chopped nuts.
  4. Repeat until all the mixture is used.

Salisbury Steak with Gravy

This is a perfect comfort meal for a cold winter night!
2 - pounds ground beef
1 - package Lipton’s Onion Soup Mix or Store Brand
1/2 - cup cracker crumbs
1 - egg
2 - packets (0.75 oz) brown gravy mix
+ the required amount of water stated on the gravy packet.
1 - cup sour cream
1 - small can mushroom stems, optional
egg noodles, rice or mashed potatoes

Make hamburger patties using ground beef, bread or cracker crumbs, egg and soup mix. Fry or grill until patties are browned on both sides. 

While the hamburgers are cooking in a bowl mix together the dry gravy mix, water and sour cream. Mix to combine. Spray. a 9 x 13 pan with nonstick and lay cooked patties in the pan.

Cover the patties with the sour cream and gravy mixture.

Bake at 350 degrees covered for 30 - 40 minutes, turning patties halfway through. Serve with egg noodles, rice or mashed potatoes.

Saturday, December 20, 2014

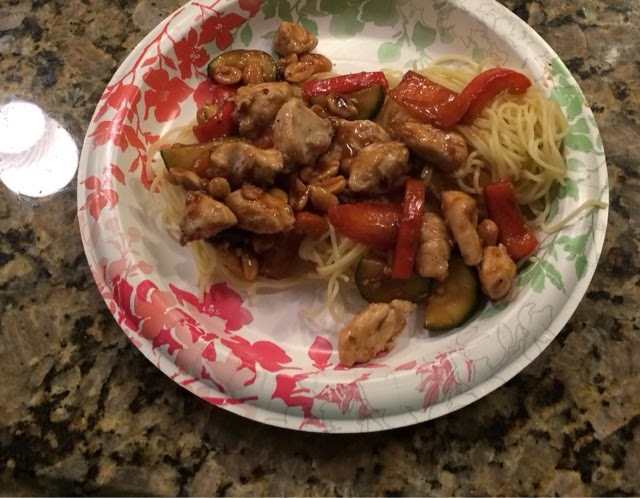
Kung pao chicken (with noodles)

  • 2 medium zucchini
  • 1 teaspoon canola oil
  • 6 oz skinless chicken breasts, cut into 1/2-inch pieces
  • Kosher salt and freshly ground black pepper, to taste
  • 1/2 red bell pepper, cut into 1/2-inch pieces
  • 1 teaspoon sesame oil
  • 2 cloves garlic, minced
  • 1 tsp fresh ground ginger
  • 2 tbsp crushed dry roasted peanut

For the sauce:

  • 1 1/2 tbsp reduced soy sauce (tamari for gluten free)
  • 1 tbsp balsamic vinegar
  • 1 tsp hoisin sauce
  • 2 1/2 tbsp water
  • 1/2 tbsp Sambal Oelek Red Chili Paste (or more to taste) I substituted with Sriracha hot chili sauce 
  • 2 tsp sugar
  • 2 tsp cornstarch

In a small bowl, whisk together soy sauce, balsamic, hoisin, water, red chili paste, sugar and cornstarch; set aside.

Season chicken with salt and pepper, to taste. Heat oil in a large, deep nonstick pan or wok over medium-high heat. Add the chicken and cook until browned and cooked through, about 4 to 5 minutes. Set aside.

Reduce heat to medium, add sesame oil, garlic and ginger to the skillet and cook until fragrant, about  30 seconds. Add the bell pepper, stir in soy sauce mixture and bring to a boil; reduce heat and simmer until thickened and bubbling, about 1-2 minutes. Stir in zucchini noodles and cook, mixing for about two minutes until just tender and mixed with the sauce. If it seems dry, don't worry the zucchini will release moisture which helps create a sauce. Once cooked, mix in chicken and top with peanuts. 

I added a little chicken broth to mix and put it over angel hair pasta. 


Chicken Broccoli Alfredo Stuffed Shells

Made this for Aaron and Chad tonight and they devoured it:)


Ingredients: 
i jar (16 oz) alfredo sauce
2 cups cooked chicken, shredded
2 cups cooked brocolli, chopped
1 cup shredded cheddar cheese
1/4 cup shredded parmesan
21 jumbo pasta shells, cooked
1 1/2 – 2 cups spaghetti sauce (optional, but I love the combination of alfredo with tomato sauce!)
Directions:
Pre-heat oven to 350 degrees.
In a large bowl, mix alfredo, chicken, broccoli, and cheeses.  Spoon mixture into pasta shells.
Grease 13 x 9 baking dish with butter or cooking spray.  Evenly spread spaghetti sauce on bottom of baking dish.  Arrange shells in baking pan.  Cover with foil and bake 35 minutes until heated thru.

Wednesday, November 26, 2014

The Best Pie Crust


YIELD: MAKES 1 SINGLE 9-INCH PIE CRUST 

This recipe can be easily doubled for a double crust pie.

INGREDIENTS

  • 1 1/2 cups unbleached all-purpose flour
  • 1/4 teaspoon salt
  • 2 teaspoons granulated sugar
  • 10 tablespoons butter, frozen
  • 1/2 cup sour cream (not lowfat or light), plus an additional tablespoon or three if needed

DIRECTIONS

  1. In a medium bowl, lightly whisk together the flour, salt and sugar. 
  2. Using the large holes of a box grater, grate the butter into the dry ingredients.
  3. With a fork, toss the butter and flour mixture until the butter pieces are all evenly coated with flour. Don't break down the butter pieces in this step, just lightly toss until they are coated with flour.
  4. Spoon the sour cream into the bowl. Using the same fork, mix the sour cream into the butter/flour mixture by pressing the fork down into the sour cream in order to mash the large clumps of sour cream into the flour and butter. A commenter suggested using a pastry blender which will help incorporate the sour cream a bit better. The sour cream won't mix in like a traditional pie crust with ice water. But take care not to overwork the dough trying to get the sour cream mixed in - if the butter pieces get too small and overprocessed, the crust will be tough. 
  5. After a few turns with the fork, it is easiest to use your hands to pull the dough together. It will look a bit shaggy but as you press it together (quickly and firmly so the the butter pieces don't melt), it should start to form a cohesive ball. 
  6. If it still seems overly dry, add a teaspoon or so of sour cream at a time until it comes together. 
  7. It's ok if there are still a few dry spots or cracks in the dough. The mixture should not be overly wet or sticky. At the same time, it shouldn't be falling apart either. It should hold together when pressed (see the pictures below). Many of you have had to add quite a bit more sour cream. That's ok as long as the crust isn't overly saturated (then it will be dense and gummy). Much of that depends on how you measure flour - if you pack the flour into your measuring cup, you'll obviously need more sour cream (try to measure the flour with a light hand). 
  8. At this point the dough can be rolled out on a lightly floured counter or it can also be pressed into a flat disc and wrapped in plastic to be refrigerated for 1-2 days or frozen for up to a month. 
  9. To roll out, lightly flour your countertop and using firm, even strokes, roll from the center outward, turning the dough a quarter turn every few strokes. The less you mess with the dough the better - even rolling - so try not to overwork it. Roll it out to a thin crust as quickly as possible. 
  10. Roll the dough over the rolling pin and unroll it onto the pie plate. Gently lift up the edges of the pie crust and settle it into the bottom of the pie plate without pressing or smushing. 
  11. Trim the edges to within 1/4-inch. Fold the short overhang underneath the top edge of the pie plate and crimp all the way around. 
  12. Cover with plastic wrap and refrigerate for 30 minutes before using. To blind bake (prebake the pie crust), line the refrigerated crust with foil and fill with dry beans or pie weights. Bake at 350 degrees for 20-25 minutes. Gently remove the foil and beans/weights and return to the oven to bake for another 10-12 minutes until nicely golden.
Recipe Source: Adapted and perfected from The Kitchen by Mel's Kitchen

My Favorite Pumpkin Pie


YIELD: MAKES 9-INCH PIE

I like to prebake the pie crust; it helps eliminate some of the gummy bottom crust common in pumpkin pie but if that doesn't bother you, you can forego that step and pour the filling into the unbaked pie shell. If you do that, still refrigerate the pie crust for an hour or so after placing it in the pan so it doesn't shrink while baking.

Also, if you are using homemade pumpkin puree, make sure it is as smooth as possible (run it through a blender or food processor again). 

INGREDIENTS

    Crust:
  • 1 single crust pie shell for a 9-inch pie plate (this is my favorite pie crust recipe)
  • Filling:
  • 2 cups (or 15-ounce can) pumpkin puree (see note)
  • 1/2 cup granulated sugar
  • 1/2 cup lightly packed brown sugar
  • 1/2 teaspoon salt
  • 1 1/2 teaspoons ground cinnamon
  • 1/4 teaspoon ground nutmeg
  • 1 teaspoon ground ginger
  • Pinch of cloves
  • 1 teaspoon vanilla extract
  • 2 large eggs
  • 2 large egg yolks
  • 2/3 cup heavy cream
  • 1/2 cup milk or half-and-half

DIRECTIONS

  1. Roll out the pie crust (see this post for a step-by-step) and gently place it into a 9-inch pie plate, trimming and fluting the edges. Cover and refrigerate for at least an hour (or up to a day or so). 
  2. Preheat the oven to 425 degrees F. Line the crust with foil and pour in dried beans or pie weights (I've even used wheat berries) until completely full. Bake the pie crust for 15 minutes. Gently remove the foil and weights (or beans) and bake another 10 minutes until the dough no longer looks raw on the bottom. Remove from the oven while preparing the filling.
  3. In a large bowl, whisk together the pumpkin, sugars, salt, cinnamon, nutmeg, ginger, cloves and vanilla until well-combined. Add the eggs, cream and milk and whisk until smooth (don't overmix or the pie will have a tendency to crack). 
  4. Place the pie shell on a baking sheet and pour the filling into the warm pie shell.
  5. Bake for 10 minutes, without removing the pie, reduce the temperature to 350 degrees F and bake for 45-55 minutes longer until the pie is set and golden on top. If the crust starts to overbrown, cover it with foil strips or a pie shield partway through baking. 
  6. Serve with a dollop of sweetened whipped cream, if desired.
Recipe source: Mel's Kitchen