Delicious recipes from the kitchens of the Butler sisters

Wednesday, November 26, 2014

The Best Pie Crust


YIELD: MAKES 1 SINGLE 9-INCH PIE CRUST 

This recipe can be easily doubled for a double crust pie.

INGREDIENTS

  • 1 1/2 cups unbleached all-purpose flour
  • 1/4 teaspoon salt
  • 2 teaspoons granulated sugar
  • 10 tablespoons butter, frozen
  • 1/2 cup sour cream (not lowfat or light), plus an additional tablespoon or three if needed

DIRECTIONS

  1. In a medium bowl, lightly whisk together the flour, salt and sugar. 
  2. Using the large holes of a box grater, grate the butter into the dry ingredients.
  3. With a fork, toss the butter and flour mixture until the butter pieces are all evenly coated with flour. Don't break down the butter pieces in this step, just lightly toss until they are coated with flour.
  4. Spoon the sour cream into the bowl. Using the same fork, mix the sour cream into the butter/flour mixture by pressing the fork down into the sour cream in order to mash the large clumps of sour cream into the flour and butter. A commenter suggested using a pastry blender which will help incorporate the sour cream a bit better. The sour cream won't mix in like a traditional pie crust with ice water. But take care not to overwork the dough trying to get the sour cream mixed in - if the butter pieces get too small and overprocessed, the crust will be tough. 
  5. After a few turns with the fork, it is easiest to use your hands to pull the dough together. It will look a bit shaggy but as you press it together (quickly and firmly so the the butter pieces don't melt), it should start to form a cohesive ball. 
  6. If it still seems overly dry, add a teaspoon or so of sour cream at a time until it comes together. 
  7. It's ok if there are still a few dry spots or cracks in the dough. The mixture should not be overly wet or sticky. At the same time, it shouldn't be falling apart either. It should hold together when pressed (see the pictures below). Many of you have had to add quite a bit more sour cream. That's ok as long as the crust isn't overly saturated (then it will be dense and gummy). Much of that depends on how you measure flour - if you pack the flour into your measuring cup, you'll obviously need more sour cream (try to measure the flour with a light hand). 
  8. At this point the dough can be rolled out on a lightly floured counter or it can also be pressed into a flat disc and wrapped in plastic to be refrigerated for 1-2 days or frozen for up to a month. 
  9. To roll out, lightly flour your countertop and using firm, even strokes, roll from the center outward, turning the dough a quarter turn every few strokes. The less you mess with the dough the better - even rolling - so try not to overwork it. Roll it out to a thin crust as quickly as possible. 
  10. Roll the dough over the rolling pin and unroll it onto the pie plate. Gently lift up the edges of the pie crust and settle it into the bottom of the pie plate without pressing or smushing. 
  11. Trim the edges to within 1/4-inch. Fold the short overhang underneath the top edge of the pie plate and crimp all the way around. 
  12. Cover with plastic wrap and refrigerate for 30 minutes before using. To blind bake (prebake the pie crust), line the refrigerated crust with foil and fill with dry beans or pie weights. Bake at 350 degrees for 20-25 minutes. Gently remove the foil and beans/weights and return to the oven to bake for another 10-12 minutes until nicely golden.
Recipe Source: Adapted and perfected from The Kitchen by Mel's Kitchen

My Favorite Pumpkin Pie


YIELD: MAKES 9-INCH PIE

I like to prebake the pie crust; it helps eliminate some of the gummy bottom crust common in pumpkin pie but if that doesn't bother you, you can forego that step and pour the filling into the unbaked pie shell. If you do that, still refrigerate the pie crust for an hour or so after placing it in the pan so it doesn't shrink while baking.

Also, if you are using homemade pumpkin puree, make sure it is as smooth as possible (run it through a blender or food processor again). 

INGREDIENTS

    Crust:
  • 1 single crust pie shell for a 9-inch pie plate (this is my favorite pie crust recipe)
  • Filling:
  • 2 cups (or 15-ounce can) pumpkin puree (see note)
  • 1/2 cup granulated sugar
  • 1/2 cup lightly packed brown sugar
  • 1/2 teaspoon salt
  • 1 1/2 teaspoons ground cinnamon
  • 1/4 teaspoon ground nutmeg
  • 1 teaspoon ground ginger
  • Pinch of cloves
  • 1 teaspoon vanilla extract
  • 2 large eggs
  • 2 large egg yolks
  • 2/3 cup heavy cream
  • 1/2 cup milk or half-and-half

DIRECTIONS

  1. Roll out the pie crust (see this post for a step-by-step) and gently place it into a 9-inch pie plate, trimming and fluting the edges. Cover and refrigerate for at least an hour (or up to a day or so). 
  2. Preheat the oven to 425 degrees F. Line the crust with foil and pour in dried beans or pie weights (I've even used wheat berries) until completely full. Bake the pie crust for 15 minutes. Gently remove the foil and weights (or beans) and bake another 10 minutes until the dough no longer looks raw on the bottom. Remove from the oven while preparing the filling.
  3. In a large bowl, whisk together the pumpkin, sugars, salt, cinnamon, nutmeg, ginger, cloves and vanilla until well-combined. Add the eggs, cream and milk and whisk until smooth (don't overmix or the pie will have a tendency to crack). 
  4. Place the pie shell on a baking sheet and pour the filling into the warm pie shell.
  5. Bake for 10 minutes, without removing the pie, reduce the temperature to 350 degrees F and bake for 45-55 minutes longer until the pie is set and golden on top. If the crust starts to overbrown, cover it with foil strips or a pie shield partway through baking. 
  6. Serve with a dollop of sweetened whipped cream, if desired.
Recipe source: Mel's Kitchen

Thursday, November 20, 2014

Spicy Tuscan Soup

Wow just realized I have posted one recipe in a year. I'm slackin' :) I love this soup from Olive Garden. Made it for dinner last night. Mmm! Ingredients • 1 pound Spicy Breakfast Sausage • 1 whole Medium Red Onion, Diced • 2 slices Bacon, Diced • 3 cloves Garlic, Minced • 3 whole Medium Potatoes • 1 quart Warm Water • 3 cubes Chicken Bouillon • ¼ bunches Kale, Roughly Chopped • ½ cups Heavy Cream • Salt And Pepper, to taste Preparation Crumble sausage into a Dutch oven and heat over medium-high heat until cooked through. Drain off the grease and set the sausage aside. Add onions and bacon into the Dutch oven. Reduce heat to medium and cook until onions are clear. Add minced garlic and cook for 1 minute. Slice potatoes in half lengthwise and cut into 1/4″ slices. Add warm water, bouillon cubes and potatoes to the Dutch oven and simmer for 15 to 20 minutes until potatoes are almost done. Add remaining ingredients as well as the sausage and simmer for 5 more minutes. Let cool and serve with warm garlic breadsticks. Enjoy! Recipe from Delicious Recipe Pins

Sunday, November 16, 2014

Buttermilk Glazed Doughnuts

Ingredients

DONUTS

  • 3 1/2 cups flour
  • 1 cup sugar
  • 1/2 teaspoon baking soda
  • 2 teaspoons baking powder
  • 1 teaspoon salt
  • 1 1/2 teaspoons nutmeg
  • 3/4 cup buttermilk
  • 4 tablespoons unsalted butter, melted
  • 2 large eggs
  • 1 large egg yolk
  • 6 cups vegetable shortening for frying

GLAZE

  • 3 cups powdered sugar
  • 1/2 teaspoon salt
  • 1/2 teaspoon vanilla extract
  • 1/2 cup cold water

Directions

  1. Mix together 1 cup flour, the sugar, baking soda, baking powder, salt, and nutmeg in a large bowl.
  2. Mix together butter, buttermilk, and eggs in a large measuring cup. Add the wet ingredients to the dry in the mixing bowl, and  beat either using an electric mixer on medium speed or by hand until smooth. Decrease the speed to low, and add the remaining flour. Mix until just combined, making sure to scrape the edges to ensure that all the liquid is incorporated. The consistency should be somewhere between cookie dough and cake batter (moist and tacky).
  3. Add the shortening to a large kettle and attach a candy thermometer to the side. Gradually heat the shortening over medium-high heat to 375F. While it's heating, turn the dough onto a floured work surface. Roll out with a heavily floured rolling pin until the dough is about 1/2" thick. Stamp out the dough rings with a donut cutter (or use two circle cutters with the second being about half the diameter of the larger one). Transfer the rounds to a large wire rack, gather the scraps, and repeat rolling and stamping until all the dough is used.
  4. Carefully drop the dough rings into the hot oil four or five at a time. Use tongs to turn the donuts as they rise to the surface. Fry the donuts until they're golden brown, about 50 seconds per side. Drain on a paper towel-lined wire rack. Let the frying oil return to temperature before adding the next batch. Repeat until all the donuts are cooked.
  5. For the glaze, mix together all the glaze ingredients in a mixing bowl until completely smooth.
  6. Dip the cooked donuts into the glaze until about halfway submerged. Remove the donuts from the glaze, then return to the wire rack set over a baking sheet, allowing to cool on the dry side.
  7. Serve warm if possible.
  8. Enjoy!

Recipe from 12 Tomatoes and adapted from The Pioneer Woman


Sunday, October 12, 2014

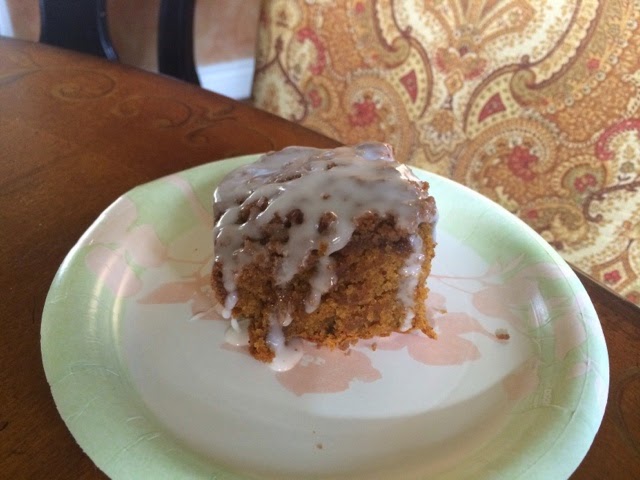
Iced Pumpkin Crumb Cake


Ingredients:

CRUMB-TOPPING

  • 1/2 cup (62 grams) all-purpose flour
  • 1/4 cup (4 Tablespoons or 60 grams) unsalted butter, cold
  • 1/2 cup (100 grams) dark brown sugar
  • 1/4 teaspoon salt
  • 2 teaspoons ground cinnamon

PUMPKIN COFFEE CAKE

  • 2 cups (250 grams) all-purpose flour (careful not to overmeasure)
  • 1 teaspoon baking soda
  • 1/2 teaspoon baking powder
  • 1/2 teaspoon salt
  • 2 teaspoons ground cinnamon
  • 1/2 teaspoon ground nutmeg*
  • 1/4 teaspoon ground cloves*
  • 1 cup (244 grams) pure pumpkin puree
  • 1/2 cup (100 grams) dark brown sugar
  • 1/2 cup (120 ml) vegetable oil (or melted coconut oil)
  • 1/4 cup (82 grams) pure maple syrup
  • 1/4 cup (60ml) milk*

VANILLA GLAZE

  • 1 cup (120 grams) confectioners' sugar
  • 1-2 Tablespoons Pumpkin Spice Coffee Creamer or milk

Directions:

Preheat the oven to 350F degrees. Generously spray a 9x9 baking pan with nonstick spray. Set aside.

Make the crumb topping first: In a small bowl, toss the flour, brown sugar, salt, and cinnamon together.  Cut in the cold butter  using a pastry blender or a fork.   Mix to create clumps and crumbs. Set aside.

Make the cake: Whisk the flour, baking soda, baking powder, salt, cinnamon, nutmeg, and cloves together in a large bowl until combined.  In a medium bowl, whisk the pumpkin, brown sugar, oil, maple syrup, and milk together until combined. Pour the wet ingredients into the dry ingredients and stir until *just* combined. Try not to overmix the batter. It will be very thick.  Spoon/pour the batter into the prepared baking pan. Spread to make an even surface.  Pour the crumb topping evenly on top and gently press them down into the batter.

Bake the cake for 30 minutes.  Check the cake's doneness by inserting a toothpick into the center. If the toothpick comes on clean with a moist crumb or two, the cake is done.  If the toothpick has wet batter on it, bake the cake for 5 more minutes.  The cake takes 32 minutes in my oven.

Make the glaze:  Whisk the confectioners' sugar and 1 Tablespoon of creamer/milk together until smooth. Add more creamer/milk to thin, if desired. Drizzle over cake.  Enjoy cake warm or at room temperature. Cover cake tightly and store at room temperature or in the refrigerator for up to 3 days.  Cake may be frozen for up to 2 months.

*Instead of nutmeg + ground cloves, 1 teaspoon pumpkin pie spice can be used in addition to the cinnamon.

*I prefer to use buttermilk in this coffee cake.  Buttermilk makes the cake even moister than any other kind of milk.  I highly recommend it.  However, regular cow's milk or dairy-free milk would be just fine. 

Recipe Source: Sally's Baking Addiction

Wednesday, October 1, 2014

Peasant Bread

So Delicious!


http://www.alexandracooks.com/2012/11/07/my-mothers-peasant-bread-the-best-easiest-bread-you-will-ever-make/

Chicken Mozzarella Pasta


Ingredients

  • 1 pound Penne Or Rigatoni
  • 2 Tablespoons Olive Oil, Plus More For Drizzling
  • 2 whole Boneless, Skinless Chicken Breasts, Cut Into Small Bite-sized Pieces
  •  Salt And Pepper
  • 1 whole Large Onion, Finely Diced
  • 2 cloves Garlic, Minced
  • 1 jar (25 Ounce) Good Quality Marinara Sauce
  • 1/2 teaspoon Crushed Red Pepper Flakes (more To Taste)
  • 1/2 cup Water
  • 2 Tablespoons Minced Fresh Parsley
  • 8 ounces, weight Fresh Mozzarella, Cut Into Medium Cubes
  • 1/4 cup Parmesan Shavings
  •  Extra Parmesan, For Serving
  • 12 whole Basil Leaves (chiffonade)

Preparation Instructions

Cook pasta according to package directions.

Heat olive oil over medium-high heat. Add chicken pieces in a single layer and sprinkle with salt and pepper. Allow to cook without stirring for 2 minutes, or until golden. Stir chicken around to brown on all sides. Remove to a plate.

In the same skillet over medium-high heat, add the onions and garlic and stir immediately to start cooking. Cook for 2 to 3 minutes, stirring occasionally, until the onions are deep golden.

Reduce the heat to low and pour in the marinara sauce, red pepper flakes, and the water. Stir until the onions and garlic are mixed in, then add the chicken back into the pan. Add the parsley, stir to combine, then allow to simmer, stirring occasionally, for about 7-8 minutes.

Make sure the sauce is bubbly and very hot, then gently stir in the mozzarella. Let it sit, undisturbed, for 2 to 3 minutes, until you can see that the mozzarella is very soft.

Drain the pasta and pour it onto a platter. Drizzle with a little olive oil. Immediately sprinkle on 1/4 cup Parmesan shavings (or grated Parmesan.) Pour on the sauce, sprinkle with extra Parmesan and the chiffonade of Basil, and serve immediately!

* NOTE: The mozzarella should be very soft but should still be in visible chunks rather than distributed throughout the sauce. It's better for the chunks to be on the firm side than the falling-apart side! You can always heat it a little more to get the cheese to the consistency you want.

Recipe Source: The Pioneer Woman